Somapop' UDS Build

Feel free to ask any questions, one of the experts will certainly respond, don't be afraid to ask anything, we were all beginners at some point.

Somapop' UDS Build

Postby somapop » 23 Jul 2014, 13:07

Hi folks,

Made a start on my UDS (in the main down to Yetidave who A: suggested such an idea in the first place! B: kindly donated a spare oil drum he had) :)

I'll be doing this over a fairly lengthily period of time due to time and financial constraints (we're also in the process of refurbishing our property). In saying that, I'm almost there parts wise.
Sourced a washing machine drum from a guy on ebay - cost a fiver (I picked it up) but will need a bit of hacking to get right. May cut out the bottom and place over an old pizza pan on 'stilts' (a few 2 - 3 inch bolts) or drill a fair few holes. Quite like the idea of having an ash catches underneath - saves cleaning the drum out so often I guess.
Clas Ohlson do a perfect size tin (£10) but I might look around for anything I can 'up cycle'.
Also bought a second hand 22.5" Landmann Kettle grill for £15 which is currently at the inlaws in Norfolk. I'll use the lid, grate and charcoal grate in the UDS.

Also like the idea of a diffuser...again, I'll look out for anything cheap I can dig up (pizza pan most likely).

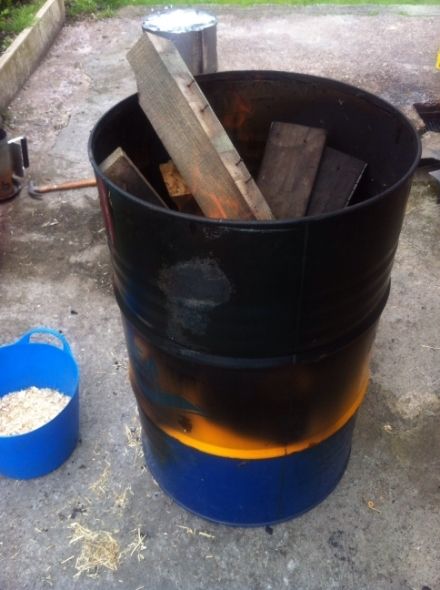
I did the burn out at the weekend (pre warned neighbours). Took a while to get started, but after an hour or two it really took. Used an old, thick pallet and other bits of old wood I had. Mask and goggles required!
Probably burned for over 5 hours in the end...and really, really hot. :twisted:
Took all the paint off bar a few bits around the base. The interior was suitably charred too (old motor oil barrel, but open vents, rain water, wash down...barely a smell of oil in there now. Gave it a good wash out with detergent, boiling water...jet wash etc.
Last night, to finish it off the clean, I sanded the exterior so it's practically back to steel. Considered sanding the inside as well, but thought a couple of coal burns and seasoning should see it right (perhaps OCD kicking in and I wanted everything completely removed?!)

Tool station provided the 3/4 nipples and SS 22mm ball valve. The total (three nipples plus associated back nuts and caps and the ball valve) came in at around a tenner (worked out not much more than me sourcing magnetic strips).

Drilled out (Using 25mm metal hole saw via SDS drill) the four holes last night. The nipples are a perfect fit (back nut secures them very tightly to the drum) but the ball valve needs something like a lock washer and nut to secure tightly.
Bit tricky sourcing these at the moment - I think the thread is around 27mm (slightly larger than the brass nipples which are around 25mm). Probably require M27 lock washers/nuts - any experience with locking these 22mm ball valves down folks?? The nut that comes with the ball valve isn't really a lock nut and so I won't be able to tighten it up to the drum. It's wobbly as hell at the moment however. :(

I was originally going to place them at four opposite points (12 o clock, quarter past, half past, quarter to) but I may eventually box this in so the back valve (I'm figuring) wouldn't draw in as much air...So, I placed the fourth nipple (as you'll see in the pic) at a quarter point. Not sure what difference this may or may not have (they'll mostly be closed anyway - but I'm aware there is discussion on placing valves/nipples in an equal manner). Easy to adapt in the future either way.

Next stage will be add bolts for grill/grates (have some stainless steel M6 30mm ones which should do fine) then paint with very high heat paint. Following that I'll use some of that rope/silicone seal (yetidave passed on a couple of links).

It will be a couple of weeks before we can head off to Norfolk so I'll pick the BBQ kettle up whilst there.
Then put it all together and start cooking :)

Main sticking point now is sorting the washing machine drum (drill 1" holes in the bottom?) and add ash basket, stilts and sort a diffuser (will use foil over grate in the mean time).

Few pics - cheers folks!

Image

Image

Image

Image

Image

Image

Image

Cheers!
somapop
Got Wood!
Got Wood!
 
Posts: 149
Joined: 02 Jul 2014, 10:05

Re: Somapop' UDS Build

Postby YetiDave » 23 Jul 2014, 14:16

Looking good man! You know, I should've mentioned that if you drill your vent holes before the burnout, things will go much more smoothly :lol:

It was the 18" version of these things that I used for a diffuser http://www.ebay.co.uk/itm/ALUMINIUM-SEP ... 3cca01ffd9

And 1" holes in the bottom of the drum should be just fine.. they worked for me! I also got a regular drill bit and drilled a ton of roughly .25" holes between 'em
YetiDave
Rubbed and Ready
Rubbed and Ready
 
Posts: 721
Joined: 28 Jun 2012, 19:30
Location: Manchester

Re: Somapop' UDS Build

Postby somapop » 23 Jul 2014, 18:18

Aye, I thought perhaps I should've drilled holes pre fire start! There's a good vid on the web of a guy doing that but also cutting slits up the side around the drum to create a kind of cyclone effect...heat reached the depths of hell!

Took a while but once it got going it really flew. Half considering doing one more small burn, but it's perhaps not necessary.

Thanks for the linkie - I'll keep my eye out for something similar.
somapop
Got Wood!
Got Wood!
 
Posts: 149
Joined: 02 Jul 2014, 10:05

Re: Somapop' UDS Build

Postby somapop » 28 Jul 2014, 11:30

Bit of an update.

Drilled 40-50 (too many?..dunno!!) 1 inch holes in the base of the washing machine drum. Using an SDS with the metal hole saw was pretty fast and easy.
Not sure whether it's worth considering grinding/cutting off the top 'lip' of the drum (viewed a build where somebody had done just that). Wondering if coals in the bottom of the drum won't heat upwards as well, merely heating that top lip section (almost like an outer edge diffuser) - thoughts?

Salvaged a handle from an old bucket (although you can buy these buckets for a quid) and drilled holes to secure it to the washing machine drum. Not quite sure if these handles are galvanised...anyone??
I will remove the plastic bit though :D

The finally spray painted the exterior and started to screw the nipples in place. The ball valve is really wobbly so I'll need to secure a lock nut or lock washer for this (not sure about size though - slightly larger than the 3/4" brass nipples so possibly M27 sized?).

One can of paint just about covered the drum, but I'll need to do another coat in the future as it's a little patchy in places.

Few more things to add, but it will be a week or two before I pick the parts up...achingly close though :)

Image

Image

Image
somapop
Got Wood!
Got Wood!
 
Posts: 149
Joined: 02 Jul 2014, 10:05

Re: Somapop' UDS Build

Postby YetiDave » 28 Jul 2014, 12:08

Lookin' good mate! I've not had any issues with the lip on the drum - the diffuser means it heats nice and evenly :)
YetiDave
Rubbed and Ready
Rubbed and Ready
 
Posts: 721
Joined: 28 Jun 2012, 19:30
Location: Manchester

Re: Somapop' UDS Build

Postby somapop » 28 Jul 2014, 16:29

Aye - just thought the lip might act as a secondary diffuser for the coals that around the perimeter of the bottom of the drum (probably why one of the builds I saw had this lip ground/cut off).
The bottom of the drum (at least on mine) is raised in the middle so coals would naturally fall to the outer edge (unless I flatten it...which I've kind of done). Hence I 'might' get a hot spot where in the middle part of the drum.
Of course, if I then add a 'real' diffuser above I might then have two diffusers working in tandem (but just above the outer section of the washing machine drum....? :?

Cheers!

PS: has anybody on here found a way to secure a 22mm level ball valve to their drum? Struggling to find answers on this one :(
somapop
Got Wood!
Got Wood!
 
Posts: 149
Joined: 02 Jul 2014, 10:05

Re: Somapop' UDS Build

Postby YetiDave » 28 Jul 2014, 20:14

My drum has the same bump on the base and the only time I get a hot spot is if I'm running it sans diffuser. I wouldn't overthink it - heat goes up, hits diffuser, travels up the sides of the drum. Et voila! Indirect heat :D
YetiDave
Rubbed and Ready
Rubbed and Ready
 
Posts: 721
Joined: 28 Jun 2012, 19:30
Location: Manchester

Re: Somapop' UDS Build

Postby somapop » 28 Jul 2014, 20:36

^^ Mind at rest! Nice, concise explanation. Will leave it be :)

Now...the challenge is to get this blinking 22mm ball valve secured to the drum (another matter entirely...might have been easier if I'd soured a 3/4" valve instead.)

Cheers!
somapop
Got Wood!
Got Wood!
 
Posts: 149
Joined: 02 Jul 2014, 10:05

Re: Somapop' UDS Build

Postby YetiDave » 29 Jul 2014, 08:51

Can you thread a washer and nut on to it? Even if it's a little loose it's something that could easily be sealed with high temperature silicone
YetiDave
Rubbed and Ready
Rubbed and Ready
 
Posts: 721
Joined: 28 Jun 2012, 19:30
Location: Manchester

Re: Somapop' UDS Build

Postby somapop » 29 Jul 2014, 14:28

I've been advised that the 15/22mm compression fittings tend not to have standard thread sizes.
Those 3/4" nipples have associated 3/4 back nuts so are easy to attach (1" threads). The thread size on my 22mm ball valve is approx 27 - 28mm. Possible I can take a chance with a M27 nut.
Other option is to grind off the flange on the nut that comes with the valve (prevents the olive falling out and clamps over the piping).
However, speaking to a plumber there's another option to a 22mm tank connector which I fit in the drum then connect a small section of pipe to this which then fits snugly on the ball valve. Perhaps a bit of a sledgehammer to crack a walnut...but I like a bit of neat hardware :)
Will end up a bit like this:

Image

There's always a few mods/hacks knocking around! Hoping when I order the fire rope there's a bit of silicone left over so I can go round all the valves/nipples at the bottom?

BTW - I've been using Big K briquettes for the time being, but have bought a bag of good quality lump wood from Unicorn in Chorlton - any other local suppliers you know of (think I read you tend to use lump wood?)

Cheers!
somapop
Got Wood!
Got Wood!
 
Posts: 149
Joined: 02 Jul 2014, 10:05

Next

Return to New To BBQ/Smoking - Help & Advice

Who is online

Users browsing this forum: Bing [Bot], Google [Bot] and 19 guests