Unit: CyberQ Wifi
Manufacturer: BBQ Guru
As a UK based BBQ competition team we do not use any force draft methods during our competition cooks, and I would say our approach is contrary to most teams. One of the tasks I set myself was to investigate the various force draft products to see how much this affects the consistency of the cooks. There are a myriad of options available, but I settled on the CyberQ Wifi unit due to its ability to communicate via Wifi (I will discuss more about this in the next review). This unit cost $399 + delivery (I delivered to a friend in the US whom brought it back for me, but the great people at BBQ Guru will happily ship it for you). On initial review this looks more expensive that its direct competitor, the Stoker from Rocks Barbecue. However once you price up the equivalent fan, probes and holders the cost of a similarly priced package is within $20. The only obvious benefit of the stoker is that it can control more than one pit. The BBQ Guru can only control one pit.
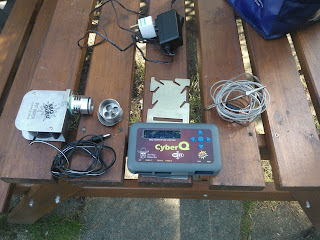
The unit I purchased was for usage on a WSM and it came with the appropriate fittings - The box included the following -
3x Food Probes (The default lenght is 6 ft, but I do recommend the larger 8ft probe length)
1x Grate Probe (Similarly, the default is 6ft, I upgraded to the 8ft) with an alligator clip
1x 10cm Fan (With baffle connector for a Weber Smokey Mountain)
1x Head Unit (This comes in a nifty little foam pouch to protect it)
1x Head Unit holder (This can be bent/fitted to your various cooker)
1x Power adapter (110/220 volt) - I had to buy a US/UK plug adapter seperately
1x Manual and 1x piece of heat resistant tape
The 10cm fan, with the smoker baffle connector is designed to fit the WSM, The fan slides (very tightly) into the adapter, which is fitted to the smoker.
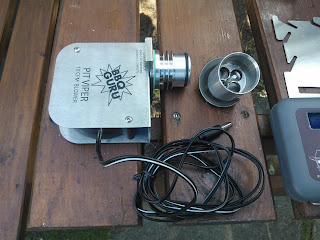
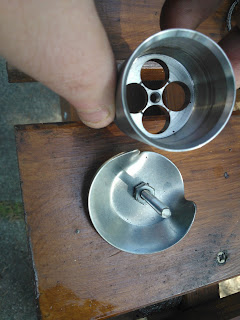
As you can see from the WSM adapter, there are 2 parts. The machining of these parts was really impressive and Im sure they will stand up to some heavy usage with no issue. The flat deflector with the screw poking out fits on the inside of the smoker, and the screw fits through the WSM vent. TIP - Make sure the vent points downwards, this ensures air flows under the basket, if its pointed up, ash/charcoal can fall into it and full the the adapter preventing airflow.
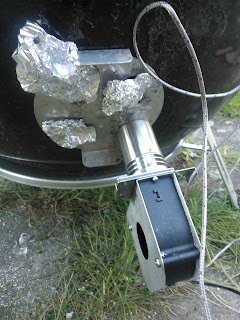
Once fitted, the fan plugs into the adapter and we are ready to cook. I managed to lose the aluminum tape to cover the other 3 holes of the WSM, but tightly packed tinfoil did a really good job. Make sure you close all the other bottom vents of the WSM.
I added 1/2 chimney of hot coals on top of the existing charcoal, not just packed in one location. The first time, I used a variation of the minion method and the unit couldnt seem to control the heat due to the large proportion of lit charcoal. This was more a case of me understanding the best usage conditions of the unit.
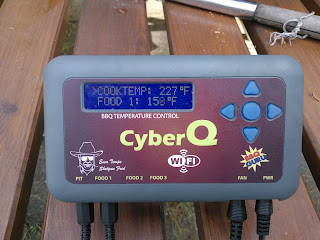
The head unit is really easy to use, plug in the 3.5mm jacks into the labelled positions (Power, Fan, Probes), set the temperature you would like the smoker to operate at, place the probes in the meat/smoker, close it all up and give it about 30mins to reach temperature. Our WSM uses a clay tray and as a result I found that CyberQ would slightly over run the target pit temperature (about 10-15F). When I tested with water in the pan, this was not the case, so I believe this is more a case of the thermo-dynamics of the clay tray. As you can see from the pic below, the cooktemp had been set at 225F, and was pretty much spot on. Hold the up/down button to change the units configuration (see my next review), I turned off the alarms/beeps to make sure I was a good neighbor.
The cook involved 3 racks of spares and 1x rack of beef ribs over 6 hours on a 57cm WSM and it was honestly a breeze. It was a warm day (22 Degrees C), with no wind, so perfect cooking conditions for the 57cm WSM. Whilst the CyberQ definitely controlled the temp, the WSM normally would not need help in these conditions. However I can see its benefits in an overnight cook, under stressful conditions (rain/wind & low temps) to keep your cooker stable. This would useful in competition or overnight cooks when you cannot attend to the cooker at all times.
Test 1 - Smoker temp startup
The smoker took about 28 minutes to reach temperature. With the lit coals the initial temperature was 115F on closing the lid. The fan ran intermittently over this period and is almost silent. The desired temperature of 225F was achieved in under 30 minutes. The natural temperature for this smoker is closer to 248F, so I know that the pit was under Cyber Q control.
Test 2 - Lid removal (1 minute)
I removed the lid for 60 seconds and then placed the lid back on. The CyberQ showed the various fluctuations, but seemed to understand that it was an open pit event. Temperature was back to normal within 5-8minutes. This is consistent with normal usage of a WSM.
Test 3 - Lid removal (10 minutes)
The temperature spikes (extra 50-80F) due to the increased oxygen. The Cyber Q fan definitely was not operating over this period. The temperature came down within 15 minutes, this is due mostly to the fact that there is no oxygen entering the unit. The temperature dropped about 20F below the target and the fan kicked into to slowly bring the temp back up. This was alot faster than I expected and a powerful advert for pit controllers.
Conclusion
As a standalone pit controller (excluding the advanced features & wifi), this is a solid purchase, thats competitively priced.
Pros - As a pit controller, this unit was incredibly easy to use. The pit probes are of a high grade, reinforced cable that will hold up against prolonged usage. There is some excellent attention to detail that make this a worthy purchase, the grate probe has an alligator clip so that you can attach it to the grates. The ability to have 3 meat probes is perfect and means I can lose the ET732. The power adapter supports 110/220 volts so can be used on both sides of the Atlantic. The LED is bright and easy to use in direct daylight and the rubber buttons are easily used even with grubby paws. The machined fan adapters are a thing of beauty!
Cons - It should stand up to a light drizzle, but I would worry about heavy rain. The head unit is made of plastic (probably to allow Wifi signal to be broadcast), as a result it does not feel as robust as its siblings (DigiQ II).